In this Article
Thought designing wristbands would be easier, didn't you?
Look no further than this post. We will jump straight into the process of designing a paper wristband and define some complications you could go through and how to correct them.
When you make your own wristband
Ever wondered how we create our vibrant wristbands? All paper wristbands from personalised fabric wristbands, wristbands to full-colour personalised wristbands go through a similar process to be created.
First of all, it's important to get some knowledge on what paper wristbands are used for? to help us gain an understanding of everything you need to know about the paper wristband and why it would be beneficial for you or your organisation to adopt it and make use of its many uses
Secondly, what you're going to want to do is understand what is your use for the printed paper wristband, this will help you determine what kind of sizing you will require to make things legible. This also helps you determine what kind of wristband you want, a VIP wristband would usually require a custom black wristband with gold text. It doesn't end here as there are so many different possibilities for a paper wristband.
Then it will help you see the possibilities that the wristband could help you achieve for its intended activity.
So for example, if it is for a children's event, you must take into consideration the size of their wrists. You won't be able to use the whole wristband for text or a barcode because it won't be seen once wrapped around their smaller wrists.
Choosing your design program to design Wristbands
Nobody wants a beautifully designed wristband that doesn't have any function whatsoever and is rendered useless.
So moving into the implementation, we should start by looking into the software you want to use. Now there aren't many options out there that are of the design industry standard.
The first option comes from the Adobe Creative Suite, the application is Adobe Illustrator you can use our Adobe Illustrator Wristband template.
A second option for software is another of the Adobe Suite collections, Adobe Photoshop Wristband template however, this program works with pixels rather than vector shapes. Simply put, this means that the quality of the print will be better produced from Illustrator rather than Photoshop.
Personally, we feel that these are the top two competitors for getting things ready for print. There are a few more options like Affinity Designer, CorelDRAW and Lucidpress. None are yet up to the level of detail that is used when printing with Adobe programs.
There is also the other option of using our Wristband online design tool, where you design and place your order in one go
Define the print areas
The next stage is actually designing. Now you must have a basic understanding of the program as a whole before you start designing something that is quite intricate as a paper wristband.
If you have acquired such understanding already you can begin to set up the document size.
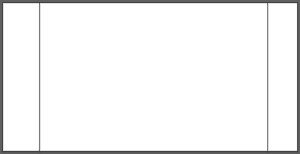
The desired artboard size would be 248mm x 25mm, however, most printers for wristbands print them in sets of five's so you're going to want to make your artboard size 248mm x 125mm so you have a height that represents five wristbands.
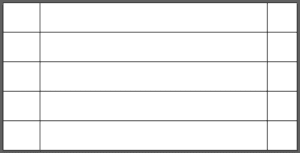
Next, you're going to want to define the printing areas on the wristband design. So start off by creating a vertical line 31mm from the left, the next step is another vertical line 223mm from the left.
Then start to add the horizontal lines at 25mm, 50mm, 75mm and 100mm. Now I think you can clearly see the layout of the five wristbands.
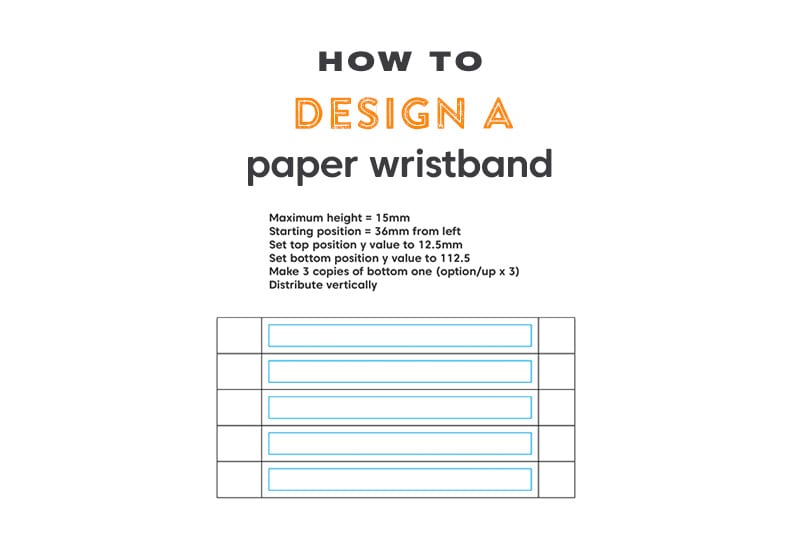
Before you go crazy and start designing your custom wristbands masterpiece, there is one more final step to get the file ready to design to ensure it will print correctly. The final step of the setup is defining the safe zone.
If you know about print-ready design, you will know the safe zone is imperative in creating print files that will print all the important information.
The safe zone should be the size of 182mm x 15mm, giving that a colour that you can distinguish from the rest of the document. We use Cyan or Magenta if that helps you decide! Then place that safe zone or safe area box in the centre of all the individual wristbands.
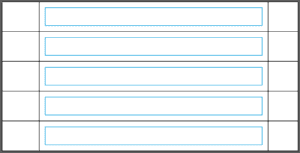
You're all set! Go absolutely crazy designing inside that middle section in between the two vertical lines. Then proceed to insert all your important information inside the Cyan coloured safe zones.
If you're reading on you must be ready to know how to save it ready for print.
Go through these steps:
File > Save as > name your file > change the format to be Adobe PDF (pdf) and hit save in a location on your computer that is easy or convenient for you to find.
Common issues when designing wristbands
You could run into numerous complications when you are running through this tutorial. Some things I would advise is to design on the latest release of software you can, fewer bugs, fewer problems.
Another minor thing that could ruin your masterpiece of a wristband is not selecting the correct anchor point for your document and its properties, it really could send your document wild, best to keep the centre point highlighted if you're a novice. Else, that stylish festival wristbands print may not come out as expected.

Another is such a simple one that even the experts sometimes come across. Align your rulers to the top left of the document. If you do multiple artworks every day your rulers may be changed to suit whatever you're working on.

Click and drag from the top left and release at that top-left point of your document (it should snap to it when you get close). This will allow certain figures we put above to guide you properly and efficiently.
Last but not least, please design in CMYK. You can always switch to CMYK at any point by going through:
File > Document Colour Code > CMYK
You'll be able to confirm that it is in CMYK mode if this is what you can see after your file's name in the current document you're working on.